Deviation Actions


Description
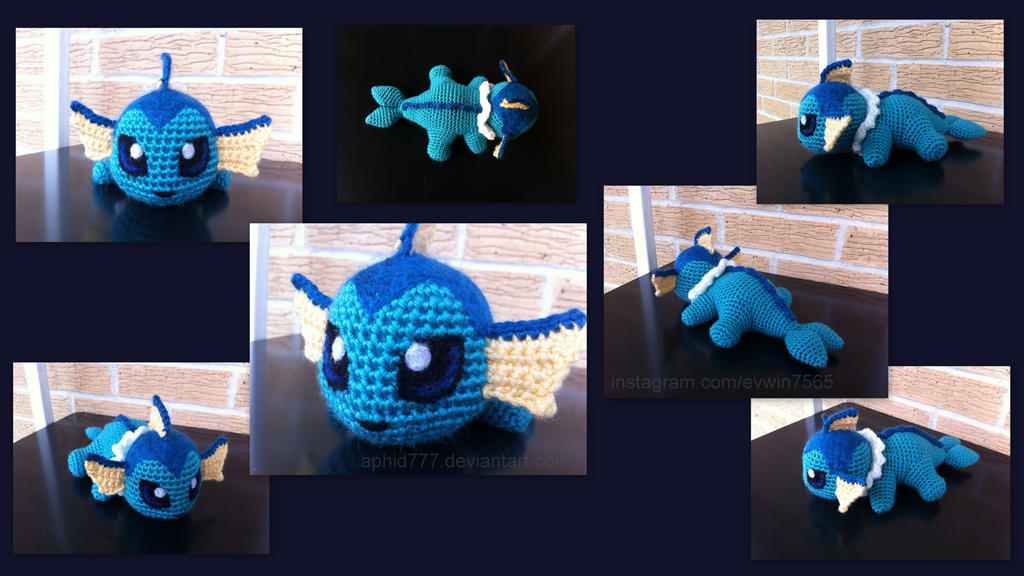
I've been putting off typing up this pattern because of all the weird little pieces. Hopefully it turns out not super confusing.. ![]()
Eyes and dark blue head pattern are needle felted onto the surface of the work: simple tutorial-->
Let me know if you catch any errors! ![]()
Other works:


Vaporeon by others:
fav.me/d7iorgg
-------
Baby Vaporeon Pattern:
As usual, I spend a lot of time typing patterns up so please credit me should you use or manipulate this pattern and please be respectful and don't sell the finished product since I don't own this character! Thank you!
If you would like to make a donation to fuel my yarn addiction and for the free patterns, I would be ever-so grateful! ![]()
Click Here to Donate
(Size F hook and worsted weight yarn for all parts)
Head:
1. Magic ring: 6
2. Inc around (12)
3. [Sc, inc] around (18)
4. [Sc 2, inc] around (24)
5. [Sc 3, inc] around (30)
6. [Sc 4, inc] around (36)
7-11. Sc around 5 times (36)
12. Sc 8, inc, sc, inc, sc 14, inc, sc, inc, sc 8 (40)
13. Sc around (40)
14. Sc 11, inc, sc 6, inc, sc 2, inc, sc 6, inc, sc 11 (44)
15. Sc around (44)
16. Sc 11, dec, sc 18, dec, sc 11 (42)
17. Sc 5, dec, sc 5, dec, sc 4, dec, 2, dec, sc 4, dec, sc 5, dec, sc 5 (36)
18. [Sc 4, dec] around (30)
19. [Sc 3, dec] around (24)
20. [Sc 2, dec] around (18)
21. [Sc, dec] around (12)
23. Dec around (6)
24. Fasten off (FO)
Note: The FO point should be approximately in the midline of the back of the head. Yes, it sort of matters because it should have subtle cheeks and a slight nose bulge. Knowing where you are will help you stuff "strategically".
-------
Tail and Body:
**The tail and body are all one piece. You will need to crochet each piece of the tail fin separately and then combine and continue into the body.
Tail:
1. Magic ring: 4
2. [Sc, inc] around (6)
3. [Sc, inc] around (9)
4. [Sc 2, inc] around (12)
5. [Sc 3, inc] around (15)
6. [Sc 4, inc] around (18)
7-8. Sc around 2 times (18)
9. [Sc 4, dec] around (15)
10. [Sc 3, dec] around (12)
11. [Sc 2, dec] around (9)
12. FO
Only fasten off for the first fin. For the second fin, repeat steps 1-11 and then continue as follows:
13. Sc, dec, sc, dec
This next step will connect the first and second fin together on one side. Insert hook into a stitch on the first fin and continue as follows:
14. Sc, dec, sc, dec, sc, dec
One side of the tail should be connected now. Insert hook back into the stitch after the connection on the second tail and continue as follows:
15. Sc, dec
Both fins should now be connected and you should have a continuous round of 12 stitches.
16. Sc around (12)
17. [Sc 3, inc] around (15)
18. [Sc 4, inc] around (18)
19. [Sc 5, inc] around (21)
20-22. Sc around 3 times (21)
At this point, add as many stitches as necessary to make the beginning of your round at approximately the mid-line of the underside of the body.
23. Sc 6, inc, sc 3, inc, sc 3, inc, sc 6 (24)
24. Sc 5, inc, sc 4, inc, sc 2, inc, sc 4, inc, sc 5 (28)
25. Sc around (28)
26. Sc 6, inc, sc 5, inc, sc 2, inc, sc 5, inc, sc 6 (32)
27. Sc 7, inc, sc 6, inc, sc 2, inc, sc 6, inc, sc 7 (36)
28. Sc 8, inc, sc 7, inc, sc 2, inc sc 7, inc, sc 8 (40)
29-36. Sc around 8 times (40)
37. Sc 6, dec, sc 6, dec,sc 3, dec, sc 3, dec, sc 6, dec, sc 6 (35)
38-40. Sc around 3 times (35)
41. [Sc 5, dec] around (30)
42. Sc around (30)
43. Sc 3, dec, sc 3, dec, sc 2, dec, sc 2, dec, sc 2, dec, sc 3, dec, sc 3 (24)
44. Sc around (24)
45. FO
(The FO point should be approximately in the midline of the underside of the body)
-------
Arms:
1. Magic ring: 6
2. Inc around (12)
3. Sc around (12)
4. 3, inc, 4, inc, 3 (14)
5. Sc around (14)
6. Sc 4, inc, sc 4, inc, sc 4 (16)
7. Sc 4, inc, sc 6, inc, sc 4 (18)
8. Sc around (18)
9. Sc 5, inc, sc 6, inc, sc 5 (20)
10. FO
(The FO point should be in the midline of the underside of the arm.)
Feet:
1. Magic ring: 6
2. Inc around (12)
3. [Sc, inc] around (18)
4. [Sc 5, inc] around (21)
5. Sc 5, dec, sc 2, dec, sc 3, dec, sc 5 (18)
6. [Sc 4, dec] around (15)
7. Sc 13, dec (14)
8. Sc 3, inc, sc 2, inc, sc 2, inc, sc 4 (17)
9. Inc, sc 4, inc, sc 3, inc, sc 2, inc, sc 4 (21)
10. [Sc 6, inc] around (24)
11. Sc around (24)
12. FO
(The feet should be feet-shaped so make sure to keep that in mind when attaching and stuffing!)
-------
Back Spikes:
1. Ch 22, turn
Starting at the third chain from the hook:
2. [Sl st, hdc, dc, sl st] repeat 5 times
3. FO
-------
Collar:
**Before doing this step, it might be wise to assemble at least Vaporeon's head and body so that you can determine how long to make the collar around the head.
**The number of stitches you will need will be a multiple of 2 plus 1 additional stitch (ie. 18+1, 20+1, 26+1). Chain and measure around the head to decide how many stitches to use. I ended up using about 27 stitches.
1. Ch 27 (or however many stitches you determined), turn
Start at second chain from the hook:
2. Sc 26 (your number -1)
3. [ Sl st, (dc, tc, dc all in next stitch)] repeat [] to the end
4. FO
-------
Head fins:
Ears: (make 2)
Yellow:
1. Ch 5, turn
Start at second ch from hook after each row for the following steps until otherwise specified.
2. Dc, sc 3, ch 1, turn (4)
3. Sc 4, ch 1, turn (4)
4. (Dc, hdc) in the same stitch, sc 2, ch 1, turn (5)
5. Sc 4, (sc, dc) in the same stitch, ch 1, turn (6)
6. (Dc, dc) in the same stitch, sc 5 (7)
7. FO
Blue:
Insert hook in the corner of the longest edge and single crochet along the edge.
Head fin:
Yellow:
1. Ch 7, turn
2. Sl st, sl st, sc, hdc, dc ch 1, turn (5)
3. Sl st, sc 2, hdc, (dc, dc) in the same stitch, ch 1, turn (6)
4. Sc 4, sl st, sl st (6)
5. Sl st one more on the edge to create a downward sloping of the fin
6. FO
Blue:
Insert hook in the corner of the longest edge and single crochet along the edge.
I have a small question that I need answered as soon as anyone Is free:
Do I stuff the tail fins? Or do I leave them flattened?
I feel like it's supposed to be flattened but I think they look better lightly stuffed and I'm just lost on the subject