ShopDreamUp AI ArtDreamUp
Deviation Actions


Suggested Deviants


Suggested Collections


You Might Like…


Featured in Groups


Badge Awards
Description
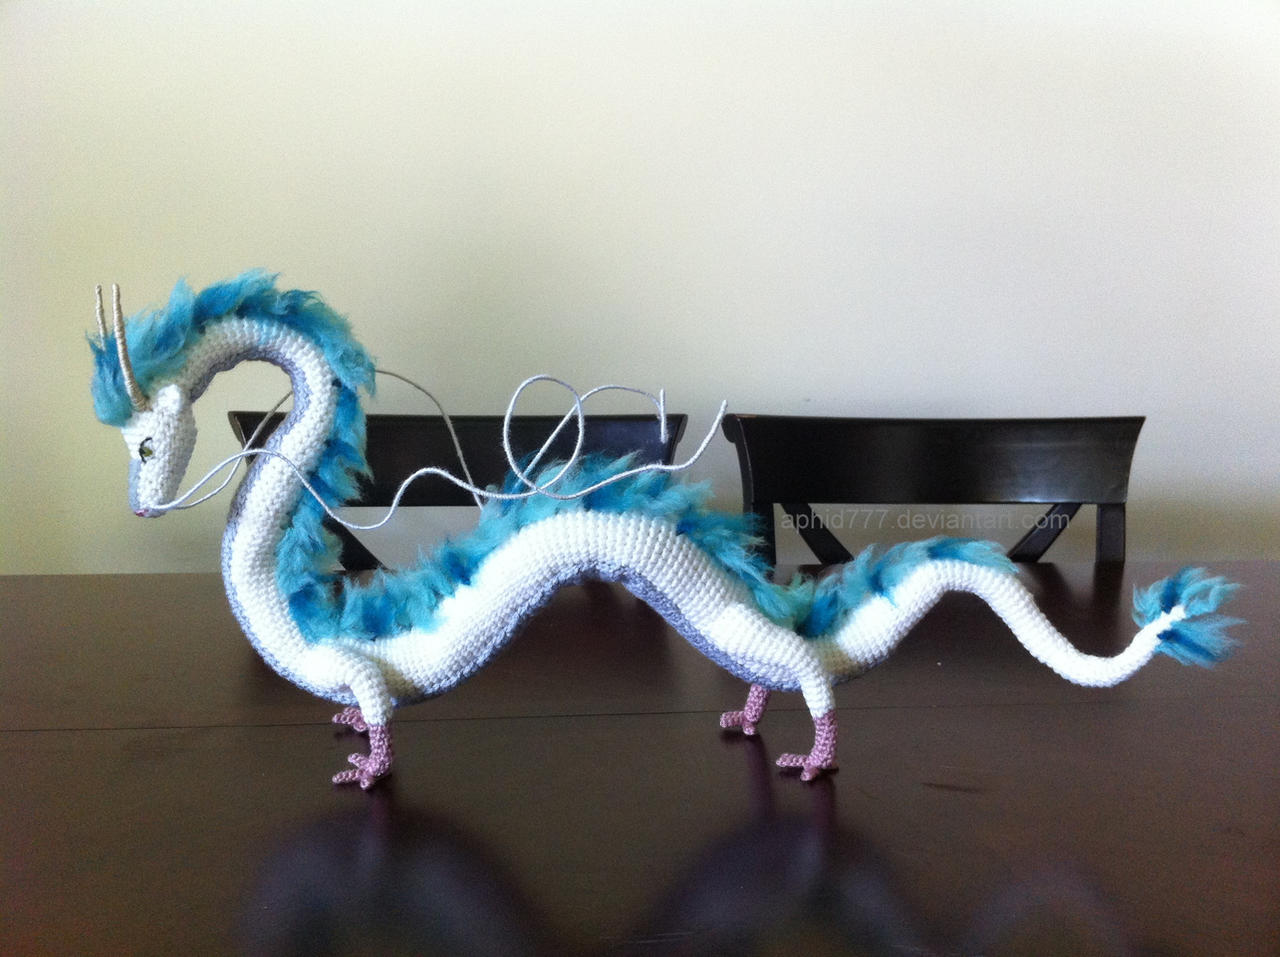
This was a rush project I did for a friend who is graduating from pharmacy school. He loves Miyazaki films and so I decided to make a smaller version of Haku as compared to my last one. This one is still at least about 30 inches long, which was (again) bigger than I was planning. I DID write notes down this time around, so I will eventually post a pattern. It will probably be a very rough pattern though since I was in such a rush but hopefully it will be understandable!
Of course, I had to take pictures of mini and huge Haku together so those will be up later because I've gotta go!")
Both Haku's:
Also check out "Small-ish Haku" made by others!
fav.me/d6918fj
Size E hook for all parts
-------
Head and Body:
**Crochet around the wire
**I like to keep my rounds in the center of his body (in this case, his underbelly) so in some areas, I added extra stitches to a round to keep the center consistent. There is a lot of room for flexibility so add stitches as you see fit (Smile)")
-Magic ring: 6
-Sc, inc, sc 2, inc, sc (8)
-Sc 2, inc, sc 2, inc, sc 2 (10)
-Sc around (10)
-Sc 3, inc, sc 2, inc, sc (12)
-Sc around (12)
-Sc 2, inc, sc 2, inc, sc 2, inc, sc 3 (15)
-Sc around 2 times (15)
-Sc 4, inc, sc 2, inc, sc 2, inc, sc 4 (18)
-Sc 5, inc, sc 2, inc, sc 3, inc, sc 5 (21)
-Sc around 3 times (21)
-Sc, dec, sc 6, dec, sc 7, dec, sc (18)
-Dec, sc 14, dec (16)
-Sc around 2 times (16)
-Inc, sc 4, dec, sc 2, dec, sc 4, inc (16)
-Sc, inc, sc 3, dec, sc 2, dec, sc 3, inc, sc (16)
-Sc 3, dec, sc 6, dec, sc 3 (14)
-Sc around 32 times (14)
-Sc about 6 more to get back to midline of underbelly
-Sc 3, inc, sc 6, inc, sc 3 (16)
-Sc around 4 times (16)
-Sc about 1 to get back to midline
-Sc 4, inc, sc 6, inc, sc 4 (18)
-Sc around 22 times (18)
-Sc about 4 more to get back to midline
-[Sc 5, inc] around (21)
-Sc around 4 times (21)
-[Sc 6, inc] around (24)
-Sc around 58 times (24)
-Sc about 7 more to get back to midline
-[Sc 6, dec] around (21)
-Sc around 9 times (21)
-[Sc 5, dec] around (18)
-Sc around 15 times (18)
-Sc 1 more
-[Sc 4, dec] around (15)
-Sc around 7 times (15)
-[Sc 3, dec] around (12)
-Sc around 12 times (12)
-[Sc 4, dec] around (10)
-Sc around 5 times (10)
-[Sc 3, dec] around (8)
-[Sc 2, dec] around (6)
-Sc around 6 times (6)
-Sc 2, dec, sc 2 (5)
-Sc around 3 times (5)
-Sc 2, dec, sc (4)
-FO
-------
Belly Strip:
-Ch 3, turn
-Sc 2, ch 1, turn
-Repeat previous step 34 times
-Sc, inc, sc (3), ch 1, turn
-Sc 3, ch 1, turn
-Repeat previous step 29 times
-Sc, inc, sc 2 (4), ch 1, turn
-Sc 4, ch 1, turn
-Repeat previous step 39 times
-Sc , dec, sc (3), ch 1, turn
-Sc 3, ch 1, turn
-Sc, dec (2)
-Ch 1, sc all the way along the edges of the strip
-FO
-------
Legs:
**Note: feet and legs are made in separate pieces and sewn together
Front Legs: (need two ~5" wires)
Pink:
-Magic ring: 6
-Sc around 6 times (6)
-[Sc 2, inc] around (8)
Switch to white:
-Sc around 5 times (8)
-[Sc 3, inc] around (10)
-Sc around (10)
-[Sc 4, inc] around (12)
-Sc around 3 times (12)
-Wire exits in this row
-Sc around 2 times (12)
-FO
Back Legs:
Pink: (Need two ~ 6" wires)
-Magic ring: 6
-Sc around 7 times (6)
-[Sc 2, inc] around (8)
Switch to white:
-Sc aournd 5 times (8)
-[Sc 3, inc] around (10)
-Sc around (10)
-[Sc 4, inc] around (12)
-Sc around 4 times (12)
-[Sc 5, inc] around (14)
-Wire exits in this round
-Sc around 4 times (14)
-FO
**The wire exiting the legs will be inserted directly into Haku's body before sewing his legs on. I ended up folding the wire for several reasons: to shorten/adjust the length as much as I needed, to hide sharp ends, as well as to make it a little sturdier.
-------
Ears:
-Ch 4, turn
-Sc, hdc, dc 2 in last st
-FO
-------
Feet: (the three front toes are made first, then the shorter, back toe)
-Ch 5
-Sl st 4
-Ch 5
-Sl st 4 and into 1st ch
-Ch 5
-Sl st 4 and into 1st ch
-Ch 4
-Sl st 3 and into 1st ch
-FO
-------
**Haku's horns are made of wire folded in half and wrapped with yarn, with more layers of yarn at the base of the horns.
**Haku's whiskers are also made of wire wrapped with yarn.
**Haku's mane is made of yarn that has been knotted on and brushed with a wire pet brush until fluffy
Of course, I had to take pictures of mini and huge Haku together so those will be up later because I've gotta go!
Both Haku's:
Also check out "Small-ish Haku" made by others!
fav.me/d6918fj
fav.me/d7odbzu
Image
*******
Edit:
This is a pretty rough pattern. I don't know what gauge wire I used (anything that can support the body and legs should work). I also don't have exact measurements for the lengths of wire used for his body, legs, and whiskers since I was experimenting myself and ended up trimming off excess wire when needed. I would estimate that I used at least 30 inches of wire for his body, 5 inches of wire for his front legs, and 6 inches of wire for his back legs (thicker wire for his body and thinner in his legs). I'll let you decide how long you want his whiskers to be
I would err more on the side of cutting wires that are too long rather than too short because you can always trim excess wire.
I also bent the tips of the wires I used in Haku's body and limbs to prevent sharp edges from poking out.
Please let me know if I've made any mistakes! And PLEASEEE don't sell this pattern or product since I do not own this character! Let's share the love!
Haku Pattern:
As usual, please credit me should you use or manipulate this pattern and please be respectful and don't sell the finished product since I don't own this character! Thank you!
Spanish translation: hastaelmonyo.com/?p=3210
If you would like to make a donation to fuel my yarn addiction and for the free patterns, I would be ever-so grateful!
Click Here to Donate
Size E hook for all parts
-------
Head and Body:
**Crochet around the wire
**I like to keep my rounds in the center of his body (in this case, his underbelly) so in some areas, I added extra stitches to a round to keep the center consistent. There is a lot of room for flexibility so add stitches as you see fit
-Magic ring: 6
-Sc, inc, sc 2, inc, sc (8)
-Sc 2, inc, sc 2, inc, sc 2 (10)
-Sc around (10)
-Sc 3, inc, sc 2, inc, sc (12)
-Sc around (12)
-Sc 2, inc, sc 2, inc, sc 2, inc, sc 3 (15)
-Sc around 2 times (15)
-Sc 4, inc, sc 2, inc, sc 2, inc, sc 4 (18)
-Sc 5, inc, sc 2, inc, sc 3, inc, sc 5 (21)
-Sc around 3 times (21)
-Sc, dec, sc 6, dec, sc 7, dec, sc (18)
-Dec, sc 14, dec (16)
-Sc around 2 times (16)
-Inc, sc 4, dec, sc 2, dec, sc 4, inc (16)
-Sc, inc, sc 3, dec, sc 2, dec, sc 3, inc, sc (16)
-Sc 3, dec, sc 6, dec, sc 3 (14)
-Sc around 32 times (14)
-Sc about 6 more to get back to midline of underbelly
-Sc 3, inc, sc 6, inc, sc 3 (16)
-Sc around 4 times (16)
-Sc about 1 to get back to midline
-Sc 4, inc, sc 6, inc, sc 4 (18)
-Sc around 22 times (18)
-Sc about 4 more to get back to midline
-[Sc 5, inc] around (21)
-Sc around 4 times (21)
-[Sc 6, inc] around (24)
-Sc around 58 times (24)
-Sc about 7 more to get back to midline
-[Sc 6, dec] around (21)
-Sc around 9 times (21)
-[Sc 5, dec] around (18)
-Sc around 15 times (18)
-Sc 1 more
-[Sc 4, dec] around (15)
-Sc around 7 times (15)
-[Sc 3, dec] around (12)
-Sc around 12 times (12)
-[Sc 4, dec] around (10)
-Sc around 5 times (10)
-[Sc 3, dec] around (8)
-[Sc 2, dec] around (6)
-Sc around 6 times (6)
-Sc 2, dec, sc 2 (5)
-Sc around 3 times (5)
-Sc 2, dec, sc (4)
-FO
-------
Belly Strip:
-Ch 3, turn
-Sc 2, ch 1, turn
-Repeat previous step 34 times
-Sc, inc, sc (3), ch 1, turn
-Sc 3, ch 1, turn
-Repeat previous step 29 times
-Sc, inc, sc 2 (4), ch 1, turn
-Sc 4, ch 1, turn
-Repeat previous step 39 times
-Sc , dec, sc (3), ch 1, turn
-Sc 3, ch 1, turn
-Sc, dec (2)
-Ch 1, sc all the way along the edges of the strip
-FO
-------
Legs:
**Note: feet and legs are made in separate pieces and sewn together
Front Legs: (need two ~5" wires)
Pink:
-Magic ring: 6
-Sc around 6 times (6)
-[Sc 2, inc] around (8)
Switch to white:
-Sc around 5 times (8)
-[Sc 3, inc] around (10)
-Sc around (10)
-[Sc 4, inc] around (12)
-Sc around 3 times (12)
-Wire exits in this row
-Sc around 2 times (12)
-FO
Back Legs:
Pink: (Need two ~ 6" wires)
-Magic ring: 6
-Sc around 7 times (6)
-[Sc 2, inc] around (8)
Switch to white:
-Sc aournd 5 times (8)
-[Sc 3, inc] around (10)
-Sc around (10)
-[Sc 4, inc] around (12)
-Sc around 4 times (12)
-[Sc 5, inc] around (14)
-Wire exits in this round
-Sc around 4 times (14)
-FO
**The wire exiting the legs will be inserted directly into Haku's body before sewing his legs on. I ended up folding the wire for several reasons: to shorten/adjust the length as much as I needed, to hide sharp ends, as well as to make it a little sturdier.
-------
Ears:
-Ch 4, turn
-Sc, hdc, dc 2 in last st
-FO
-------
Feet: (the three front toes are made first, then the shorter, back toe)
-Ch 5
-Sl st 4
-Ch 5
-Sl st 4 and into 1st ch
-Ch 5
-Sl st 4 and into 1st ch
-Ch 4
-Sl st 3 and into 1st ch
-FO
-------
**Haku's horns are made of wire folded in half and wrapped with yarn, with more layers of yarn at the base of the horns.
**Haku's whiskers are also made of wire wrapped with yarn.
**Haku's mane is made of yarn that has been knotted on and brushed with a wire pet brush until fluffy
Image size
2592x1936px 1.82 MB
Make
Apple
Model
iPhone 4
Shutter Speed
1/15 second
Aperture
F/2.8
Focal Length
4 mm
ISO Speed
160
Date Taken
May 18, 2013, 8:30:15 AM
© 2013 - 2024 aphid777
Comments640
Join the community to add your comment. Already a deviant? Log In
Wow!